
What is Dev Ops?
Before looking at how to configure Azure Dev Ops it is important to understand what DevOps is. Like the word, DevOps is combing development with operations. The goal is to get updates and features to the end user faster and in a more automated fashion. In a water fall method, gathering requirements, development, testing, and deployment are handled in an IT bubble. The end user isn't part of the process until the end. How is the team supposed to know if they are on the right track? What if something was interpreted wrong? These types of issues can cause lengthy hold ups and serious budget issues. Agile tries to rectify this by working with the business owners more regularly by deploying smaller features at a faster pace. The goal is to get feedback quicker and pivot to to that feedback.

Continuous Integration
Continuous integration is the first step of our DevOps automation. Usually a team is made up of more than one developer. Each developer will be working on a feature or part of a feature. When they are done, they must integrate their code with the rest of the code. Using the source control called Git developers can request the code be integrated into the rest of the code with a pull request. This can alert a manager or other developers to review the code then approve the merge. This will merge the code back into the larger code set and the developer can pull a new feature. To make sure the code integrates correctly, a developer will create a series of unit tests to validate the code passes the requirements. If the tests do not pass the merged updates will not deploy the updates.
Continuous Delivery
Continuous delivery is the automation of deploying the code to an environment. Once the code is accepted into the branch a release is created and a user is alerted to initiate the deployment of code. This is especially useful for production ready code, it allows for a person to intervene and review the code before it is deployed to a production site. Typically once the review is over the user will approve and the code is deployed.
Continuous Deployment
Continuous deployment removes the human interaction from the delivery side. This is useful for you dev and staging sites and will allow for developers to freely deploy their code into a site seamlessly to see changes immediately once all tests pass from the integration side. It is assumed here that test cases and unit tests have been thoroughly designed and tested otherwise it is very easy to introduce a bug without someone knowing.
Setting up branches
When setting up branches, I prefer the Gitflow strategy that can be referenced here https://www.gitkraken.com/learn/git/git-flow
What makes this setup different from other git strategies is the fact that there are 3 main branches and then branches are created from these. Other styles will create a new feature branch for new changes and create releases from this instead of merging into one main branch for production.
3 main branches
1) Main branch - production code
2) dev branch - development of new features
3) Hotfix branch - fixes for production.
From the dev branch you would create your feature or release branches, from the hotfix branch you would create branches for fixing production bugs, and additional branches should be made from dev branch or hotfix branch then merged into these branches. Having a dev branch, we are able to create an integration site for testing and approved before deployment. Because multiple features and releases can be merged into the dev branch before making it to production you must make sure your dev branch is production ready before the merge, which will require a code freeze before promoting to production. This is the main difference between continuous deployment and continuous delivery.

Creating a CI/CD solution in 5 minutes
To begin using Azure Dev ops we need something to deploy and interact with our site. To begin, we will create a new code repository for source control, I called mine "ci_cd blog". When creating your repository make sure to choose GIT and not TFVC.

With our repository created we can clone it to our local machine.
I will then create a simple web application along with a test project.
dotnet new mvc -o BasicApp
Before I commit my code, I will want to to setup my continuous integration pipeline. This is the pipeline section


Next we must select where our code is currently stored. Our code for this example will be stored within Azure Dev Ops, so I will select "Azure Repos Git". Azure Dev Ops also integrates with GitHub or other git repositories if those are being used. Notice the bubble that says YAML, this is the language used to develop the pipeline.

Once the Azure Repos Git is selected, the pipeline must be tied to a repo. The next step is to select the repo created earlier.

From within the pipeline section, I will select Pipelines. The pipeline is where I will create the build/test/deploy for my application. Before an application is deployed the pipeline will run several commands to ensure our code is ready to deploy. If it does not the pipeline fails and our code will not be deployed to the application. To create a pipeline, click "Pipelines" and then select "Create Pipeline"

Next we must select where our code is currently stored. Our code for this example will be stored within Azure Dev Ops, so I will select "Azure Repos Git". Azure Dev Ops also integrates with GitHub or other git repositories if those are being used. Notice the bubble that says YAML, this is the language used to develop the pipeline.


The pipeline should now look like this.

//TODO: pool code
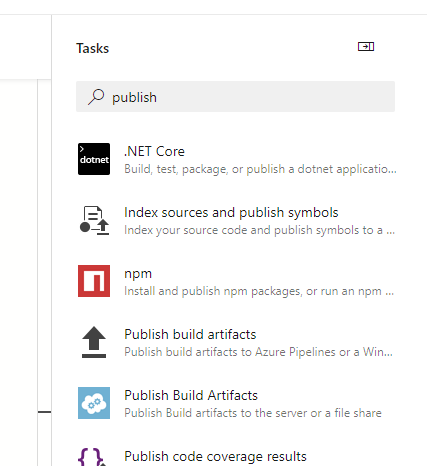
A basic pipeline should consist of at least 5 steps. Our project should build, test, publish, copy published files, then publish those files to the pipeline. In the menu to the right, we see several tasks, here we can select the tasks above to implement in our pipeline. Simply search for what you want to accomplish and the task will help you build the basics for each task. Intellisense in the pipeline will also give you clues to advanced settings the GUI doesn't offer. In the tasks we will use the .NET Core task to build, test, and publish our files.


Once you click Add at the bottom, our YAML file will fill in with the appropriate syntax.
//TODO build code
Our test and publish are the same, steps. Publish offers more options, we will use the defaults.
//TODO: test code
//TODO publish code
Test will run our test projects and if it fails will stop the pipeline and publishing. This keeps the published site clean and free from any mistakes.
Now that the project is built and tested, the published files get copied to the staging directory. We do this to keep folder clean, an advanced setting is "CleanTargetFolder" this way the code is copied to an empty directory and old/bad DLLs, files, or zips are not published. We will use the built in variables for the directories.


//TODO: copy file Yaml
For the fifth step we can do one of two things. First, we could just deploy directly to Azure from the pipeline. I only recommend this solution for dev environments, the reason being is it does not give you control over what is deployed to your environment. If the pipeline builds it will deploy automatically. This removes any approval control or deferral of deployment. Also, it does not give you the option to roll back to a previous build. You would need to run the entire pipeline again to revert your deployment which can be costly.

I prefer to use releases to deploy my code. These can still be continuous and without intervention, but it gives more control over what happens when our code deploys. To create a release, a pipeline container must be created. To do this, search "publish" to find the "Publish build artifacts" in the task pane. For the task details, the default values will work.

//TODO: publish artifacts YAML

Setup deployment Releases
1) Create new release pipeline
2) Select app service deployment
3) Name deployment stage
4) Click job/task in stage
5) select step.
6) connect to subscription
Adding Code to the repository
1) open a project in VSCode
Before connecting to the project, a git repository must be created locally, open the termianal in VSCode and type the following commands:
2) run "Git Init" to create empty git repository
3) run "git add ." to add all items to git repository
4) run "git commit -m "Initial Commit" " this will commit all items to be ready to push to repository
Now, open the devops repository to find the clone button. This will give the repository URL to push our project too
5) In devops go to your repository and find the clone button and copy URL


Using the Clone button can result in lost code we do not want to pull the empty project, we want to push what we have to the empty project. To do this type the following commands in the VSCode terminal.
6) "git remote add origin <url>"
*Be sure to replace <url> with the url copied from DevOps
Once connected to the remote origin run "git push" to push your committed files. You should receive a prompt to login using your email/password. If not, you can create an account credentials by selecting the little man in the corner and going to alternate credentials.
7) "git push"

When the project is pushed, our repository will automatically kick off and start publishing our website. With that, a successful DevOps pipeline is created.